










Nancy Shang | Founder and CEO, MICET | Published September 16, 2026
A cylindroconical fermenter’s performance hinges on four interlocking choices: cone angle, height-to-diameter ratio, jacket zoning, and racking arm height. Get the cone angle wrong and yeast won’t drop cleanly; skip jacket zoning and cooling lags during high-krausen fermentation. This guide breaks down each tradeoff and what MICET’s published fermenter specs actually cover.
What a Cylindroconical Fermenter Actually Is
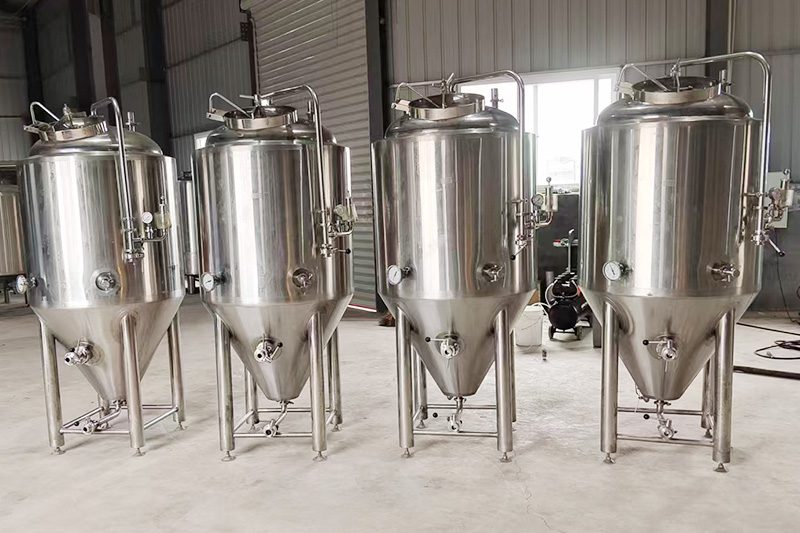
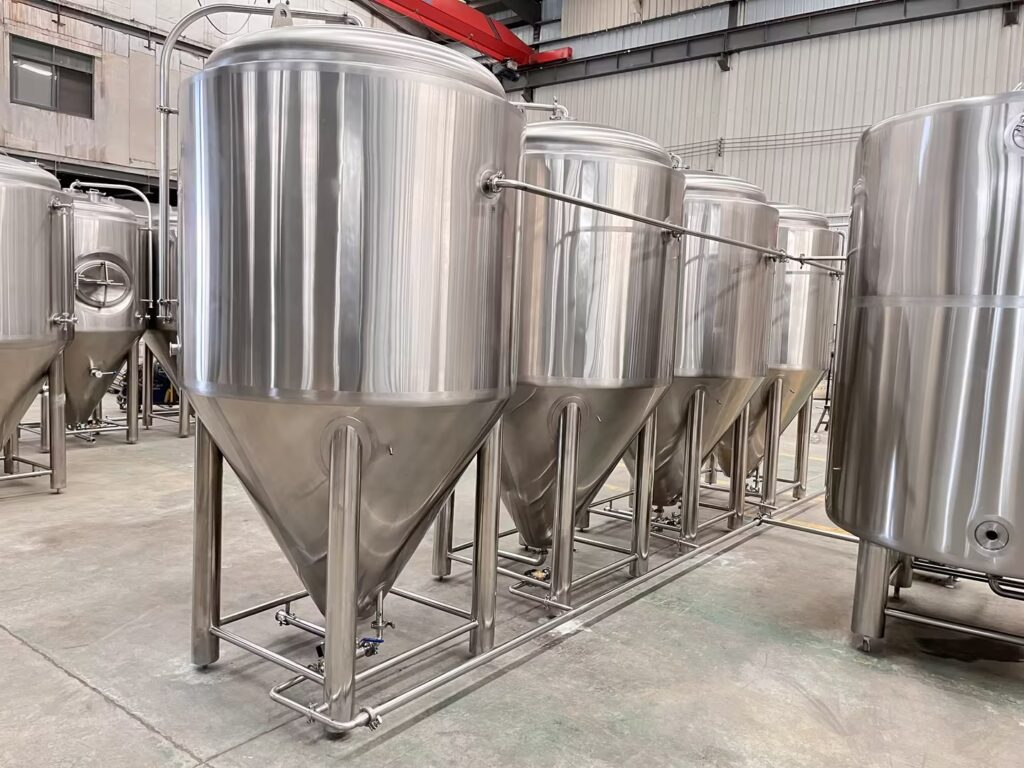
A cylindroconical fermenter (CCF) is a vertical tank with a cylindrical fermentation chamber sitting on top of a cone-shaped base. The shape does two jobs at once: it holds beer during active fermentation, and its cone geometry lets yeast and trub settle to a single low point instead of spreading across a flat floor. That single point is where the harvest valve sits.
The tradeoff is baked into the shape itself. A tank optimized purely for yeast drop-out — a narrow, steep cone — costs more per liter of usable volume than a shallow-cone design built for storage efficiency. Every dimension decision downstream of the cone angle is a compromise between these two goals.
Cone Angle: The 60° Default and When It’s Wrong
Most commercial CCFs use a cone angle somewhere between 60° and 70° from horizontal. At that slope, sediment slides toward the harvest valve under gravity alone, without mechanical agitation. Go shallower than roughly 45° and material starts sticking to the cone walls instead of sliding — brewers end up rousing the tank or accepting yeast loss they didn’t plan for.
Steeper isn’t automatically better, though. A tighter cone concentrates trub and yeast into a smaller footprint, which shortens the harvest window and improves yeast viability for repitching. It also increases fabrication cost near the base, since more steel is needed to close a narrow angle without weak welds at the transition seam. For a homebrew-to-nano jump (under 1,000L), the extra cost per degree of cone steepness rarely pays for itself. For a production brewery repitching the same yeast strain across 10+ batches, it usually does.
Height-to-Diameter Ratio: The Tradeoff Nobody Explains Upfront
Height-to-diameter (H:D) ratio decides how much surface area the beer has relative to its volume, and that changes fermentation behavior more than most buyers expect going in.
A tall, narrow tank (H:D above roughly 3:1) builds more hydrostatic pressure at the bottom, which can suppress ester production in some yeast strains — useful for clean lager profiles, less useful when a brewer wants a fruity ale character. It also concentrates CO2 pressure unevenly through the fermenting wort, so temperature control has to work harder near the base than near the top.
A squatter tank (H:D closer to 1:1 or 1.5:1) fits under lower ceiling clearances and ferments with less pressure differential top to bottom, but takes up more floor footprint per liter of capacity. For a brewery converting an existing retail or warehouse space rather than building to spec, floor footprint often decides the ratio before fermentation chemistry does.
Where Does the Cooling Load Really Concentrate? Jacket Zoning
A single glycol jacket wrapped around the whole tank cools evenly in theory. In practice, fermentation generates most of its heat during high krausen — the first 24 to 48 hours — and that heat concentrates in the upper cylindrical section where yeast activity peaks, not the cone.
Multi-zone jacketing splits the cooling surface into separate glycol circuits, usually one for the upper cylinder and one for the cone, so the control system can pull heat aggressively from the active zone without overcooling the settled sediment below. Single-zone jackets are cheaper to fabricate and simpler to plumb, but they force a compromise: set the glycol temperature for the hot zone and the cone runs colder than necessary, or set it for average conditions and peak krausen runs warmer than the recipe calls for.
For most fermenters under 20 BBL running standard ale or lager schedules, single-zone jacketing is adequate. Multi-zone control earns its added plumbing complexity mainly on larger tanks or where a brewery is running temperature-sensitive strains across variable batch sizes.
Racking Arm Placement Isn’t an Afterthought
The racking arm — the fitting used to draw finished beer off the tank without disturbing settled sediment — sits above the cone’s lowest point, not at it. Its exact height above the transition seam determines how much clear beer a brewer can pull before trub starts coming through, and how much product gets left behind or has to be filtered separately.
Set too low, and the arm draws sediment into the racked beer during the final draw. Set too high, and usable beer volume drops because more liquid sits below the arm than the cone geometry requires. On a well-specified CCF, racking arm height is matched to the cone angle and expected sediment volume for the batch size, not bolted on at a default position regardless of tank shape.
MICET Used Fermentation Tank Specs: What’s Published and What Isn’t
MICET’s used fermentation tank inventory is published with capacity, material, and thermal specifications. Cone angle, height-to-diameter ratio, jacket zone count, and racking arm height are not part of the published catalog and are not estimated here — buyers evaluating a specific unit should request the fabrication drawing before purchase.
| Spec | Published Value |
| Capacity range | 3–5 BBL, 10 BBL, 20 BBL, 40 BBL; also 2T / 4T / 6T (2,000L / 4,000L / 6,000L total; 1,800L / 3,600L / 5,400L working capacity) |
| Shell material | SUS304 스테인리스 스틸 |
| 냉각 | Glycol jacket |
| 절연 | Polyurethane |
| Design pressure | 0.2 MPa |
| Test pressure | 0.3 MPa |
| Cone angle | Not disclosed |
| Height-to-diameter ratio | Not disclosed |
| Jacket zone count | Not disclosed |
| Racking arm height | Not disclosed |
| Individual-unit certification | Not disclosed |
On that last row: MICET holds a Verification of Conformity for fermentation equipment (ICR/VC/HM2507146, issued by ICR Co., Ltd., under the EU Pressure Equipment Directive 2014/68/EU, tested to EN 1626:2008 and EN 10204:2004, valid through July 15, 2030). That verification applies at the organization and product-line level. It doesn’t transfer automatically to a specific used or refurbished tank on the resale floor — a used unit’s individual documentation should be confirmed separately before it factors into a purchase decision.
Standalone pricing for fermentation tanks isn’t published either. MICET’s disclosed ranges cover microbrewery systems (30,000–80,000 USD) and complete commercial systems at 10 BBL minimum (50,000–80,000 USD) — both bundle brewhouse, fermentation, and ancillary equipment rather than pricing a fermenter alone. A standalone used fermenter quote depends on capacity, condition, and current inventory, so it has to come from a direct request rather than a published number.
The Misconception That Costs Buyers Money: Steeper Isn’t Always Better
The most common mistake in fermenter selection is treating cone angle as a single “better or worse” spectrum, with steeper always winning. It doesn’t work that way for used equipment specifically.
A steep-cone tank pulled from a lager-focused brewery was likely optimized for clean, slow-dropping strains repitched many times. Installed into an ale-heavy production schedule with faster, more flocculent yeast, that same steep cone can actually cause harvest-valve clogging, because the sediment compacts faster than the smaller outlet can clear it. The geometry that made a used tank ideal for its original owner doesn’t automatically transfer to a different fermentation profile. Buyers comparing used cylindroconical tanks need the original brewery’s yeast strain and batch cadence, not just the cone angle in isolation, to judge fit.
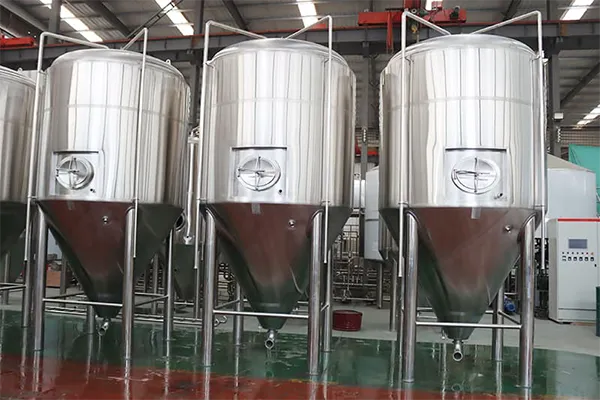
Used vs. New: What to Verify Before You Buy
Buying a used cylindroconical fermenter trades a lower price for the responsibility of verifying geometry and condition yourself, since resale listings rarely include the original fabrication drawing. A practical pre-purchase check looks like this:
-
Request the original fabrication drawing or general arrangement (GA) sheet, including cone angle and racking arm height.
- Confirm the design and test pressure ratings against the tank’s current pressure gauge or a fresh hydrostatic test, not the nameplate alone — nameplates can outlive gasket and weld integrity.
- Inspect the jacket for glycol leaks at weld seams, particularly near the cone-to-cylinder transition, where thermal cycling stresses the joint most.
- Verify polyurethane insulation hasn’t degraded or trapped moisture, which shows up as cold spots or condensation on the outer shell during a cooling cycle.
- Ask whether the seller can provide individual-unit test documentation, separate from any manufacturer-level certification that doesn’t cover the specific tank.
New fermenters cost more but come with a documented cone angle, H:D ratio, and jacket configuration matched to the buyer’s stated fermentation profile from the start. Used units cost less and can be sourced faster, but the geometry was set for someone else’s yeast strain and batch size — the buyer inherits that decision along with the tank.
FAQ
Q: Is there one “correct” cone angle for a craft brewery fermenter?
A: No single angle works for every strain and batch size. A steeper cone (closer to 70°) speeds sediment drop-out and suits strains repitched frequently; a shallower cone (closer to 60°) trades some of that speed for lower fabrication cost. The right angle depends on yeast flocculation behavior and how often the brewery repitches, not a universal standard.
Q: Does a taller height-to-diameter ratio always mean a “better” fermenter?
A: No. A taller ratio increases hydrostatic pressure and can suppress ester production, which helps clean lager profiles but works against brewers targeting a fruitier ale character. Ceiling clearance and floor footprint also factor into which ratio actually fits a given space.
Q: If MICET holds a pressure equipment certification, does that cover every used fermenter it sells?
A: The Verification of Conformity (ICR/VC/HM2507146) is an organization- and product-line-level document, not a per-unit certificate. A specific used tank’s individual documentation and test history should be confirmed separately before purchase.
Q: How much does a used cylindroconical fermenter cost?
A: MICET doesn’t publish standalone fermenter pricing; disclosed ranges cover bundled microbrewery (30,000–80,000 USD) and 10 BBL-minimum commercial systems (50,000–80,000 USD). Contact MICET directly for a quote on a specific used fermenter capacity and condition.